Posted: October 13th, 2009 | Author: jordan | Filed under: Free Geek, Insight, LDAP, Vancouver, VPN | No Comments »
As I touched on very briefly in one of my previous posts, I volunteer. I volunteer for a non-profit organization by the name of Free Geek. It’s the local chapter here in Vancouver and they have a very simple purpose. Their website states: Free Geek is a nonprofit community organisation that reduces the environmental impact of waste electronics by reusing and recycling donated technology. Through community engagement we provide education, job skills training, Internet access and free or low cost computers to the public.
 When I first arrived at Free Geek I was amazed at how much computer hardware there actually was, but even MORE amazed the second time I went to see that it all had changed. I mean, all of it. The amount of hardware that that flows through their doors is mind boggling. Immediately I knew this was something I wanted to be a part of. I met one of the founders and explained my talents and I what I could do for them, Ifny LaChance, she hugged me! She explained that Free Geek was desperately in need of a good Systems Administrator as their current person could not adequately handle the failing systems. The Free Geek infrastructure suffered from network outages, power outages, overheating, and poor performance, and they were all considered part and parcel of the environment. Most of the users had learned to live with it, or work around the issues.
They use a system called LTSP for all of their public and private workstations. These workstations were at a crawl. The first thing I took care of was all the physical wiring between computers, switches, and servers. While pulling cable out I would find the oddest things, like a six foot ethernet cable running from a switch to hub, then from that hub another cable extending about four feet to a switch. This switch was not only then connected to three different computers but also plugged back into the same switch that this connection originated from! After the wiring had been taken care of, an 802.1d trunk was introduced between two main switches and then VLAN’s were placed on the network to segregate subnets up a little better and to give some added security.
Since then I’ve gone on to introduce an OpenLDAP directory system, integrate user authentication for all workstations and switches. Created an OpenVPN install and added services such as SNMP monitoring by way of Zenoss. I am on a never-ending mission to improve the stability and the scalability of their infrastructure while only being able to work with recycled hardware and open-sourced software. It has been a great challenge, but of all the years I have worked with technology I must say that nothing compares with the satisfaction I feel from knowing my hours of labour are enabling an amazing organization to help keep this planet green and give back to the community.
Please visit their website to see how you can help. freegeekvancouver.org
Posted: October 6th, 2009 | Author: jordan | Filed under: LDAP, VPN | 6 Comments »
I volunteer for an organization called Free Geek, it’s the local chapter here in vancouver and they are such an amazing group of people. Upon seeing the organization I felt compelled to get involved and offer my services as best I could for them. Since I’m a sysadmin by trade I figured that’s what I would do, although I what I did not know was the state of affairs in which their network lay. That is story onto itself however. For this post I’m going to be writing about the OpenVPN Access Server implementation I performed for them.
First, OpenVPN is a great product. Period. They make a secure, easy to configure and deploy, SSL based VPN solution. As long as you know how PKI works you can link multiple sites or users together in just a few minutes. For those of you though who do not want to bother all this command

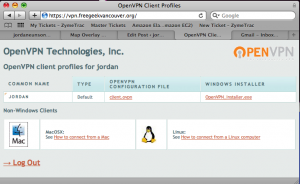
OpenVPN AS User Portal
line stuff
OpenVPN makes a product called
“Access Server.” It’s an easy to install, complete with GUI admin interface VPN implementation. Basically the exact same thing as their open source version, just a HELL of a lot easier to get up and running. Especially for people who are not all familiar with VPN. Shown here in the thumbnail is what the user sees when he or she logs into the web interface of the vpn service. I very simple to read and understand page that asks them which OS they are on and how to configure that OS. Also listed here is the VPN key (client.ovpn) so they can setup their VPN software themselves.

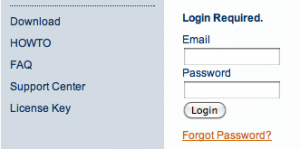
License Key
To install this wonderful service I first went
here, got an account and downloaded the necessary linux package. After installing I went back to the Access Server site and requested a license key. Yes, a license key. Here’s the catch about OpenVPN Access Server. It’s free, for the first two concurrent connections, after that you have to pay per connection. They’re $10 each, which is a HUGE savings over other solutions out there, and they’re sold in packs of five. For my needs though I only require two.

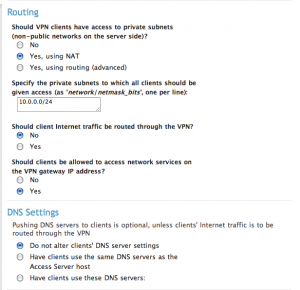
VPN Settings
After installation, I forwarded ports 443 and 8443 thru my firewall to the VPN server. You can sign into the admin interface using the root credentials of the computer it resides on at https://webaddress/admin. To configure it I did the following, first under
Configuration I selected “License” and installed my license keys. Next, I went to “VPN Settings” and told server to route using NAT, client Internet traffic should NOT go thru the VPN, that clients WILL be allowed access to network services on the VPN gateway IP. If you have Mac clients connecting, it’s just easier to select NO to altering your client’s DNS records. If it’s just Linux you could do them same considering push DNS support is just not there for linux either.

LDAP Integration
Now it’s time for the fun part, OpenLDAP integration. On the left hand side under
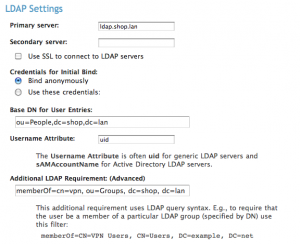
Authentication select “LDAP.” Now you don’t have to use LDAP, it’s just that I do cause I like it. If you have a small user base, or if its just for you, use PAM. I don’t care. I don’t judge! (much…) Type in all the normal stuff, LDAP server, base DN, and username attribute. (Either uid, or uniqueMember, or user. Usually uid) This will authorize any valid user in your LDAP directory authorization attempt authentication, but for my purposes this was way too wide open. Free Geek has number of lame-o accounts for guest access that are part of our LDAP schema. So I want to restrict access to only member that are part of the LDAP group “vpn.” This however proved to be more difficult than originally thought.
In OpenLDAP it’s not common for a user entry to list what groups they are part of. In fact, it’s the other way around, you ask the group who its members are. Since OpenVPN want to use a filter on the user’s entry in OpenLDAP this setup was not going to work for me. Enter the memberOf overlay. For those of you who do not know what this does, let me explain. When you add a user to a group the user’s entry does not change, instead the group’s entry changes. So let’s say we add Sally to the group, lusers. If we queried the group lusers we would get an entry like:
memberUid: Sally
But if we queried Sally’s account it would appear the same as before we added her to this group. Therefore we need to modify our OpenLDAP install to allow for a reverse membership.
What I had to do was stop the ”slapd” service on my LDAP server and edit my slapd.conf file and add the following two lines.
moduleload      memberof.la

overlay memberof
Then I had to create an ldif file with the following contents:
#contents of memberOf.ldif

dn: cn=vpn,ou=Groups,dc=shop,dc=lan

objectclass: groupofnames

cn: vpn

description: Users allowed to connect on VPN

member: uid=jordan,ou=People,dc=shop,dc=lan
And add this to my ldap database slapadd -f memberOf.ldif
After this I fired up the ldap server in debug to check for errors slapd -d 99 -f /etc/ldap/slapd.conf and check to make sure that my group membership of “vpn” was listed in my user entry. ldapsearch -h ldap -x -b "dc=shop,dc=lan" '(uid=jordan)' memberOf and bam! success!
# jordan, People, shop.lan

dn: uid=jordan,ou=People,dc=shop,dc=lan

memberOf: cn=vpn,ou=Groups,dc=shop,dc=lan
So I fired the init.d slapd service back up and went back to the OpenVPN admin interface. For the LDAP filter at the bottom of the window I entered memberof=cn=vpn,ou=Groups,dc=shop,dc=lan I saved and restarted the VPN service and poof. I now have authorization based on group membership!
Posted: October 1st, 2009 | Author: jordan | Filed under: LDAP, Mac OS X Server | 1 Comment »
So you have an Open Directory server and you want to extend the LDAP schema? Interesting, well as you probably have already noticed, if you go about it the wrong way your LDAP schema will not replicate to your Open Directory Replicas. The proper way to extend or add additional schemas is as follows:
First, you need to have your *.schema that you want to install. Place it into /etc/openldap/schemas/ and add the schema to /etc/openldap/slapd.conf
Second, you’ll need to shutdown ldap and launch it manually to generate the appropriate ldif files.
- launchctl unload /System/Library/LaunchDaemons/org.openldap.slapd.plist
- /usr/libexec/slapd -d 99 -f /etc/openldap/slapd.conf -F /etc/openldap/slad.d
Ensure the message output on your screen indicates that the service fired up correctly and then ctrl-C out of it.
Next, you want to go into the slapd.d\cn=config\cn=schema folder and find the file that says cn={X}schemaname.ldif. Edit it and strip off all the lines that start with:
- dn
- cn
- objectClass
- entryUUID
- creatorsName
- createTimestamp
- entryCSN
- modifiersName
- modifyTimestamp
Take the remainder of the file and cat it onto the customSchema.ldif file.
- cat cn\=\{8\}myschema.ldif >> cn\=\{9\}customSchema.ldif
Be careful with this step though, watch spacing, line breaks, and formatting. Here’s an example to see if yours looks right.
olcAttributeTypes: {0}( 1.3.6.1.4.1.30540.2.1.101

 NAME 'ec2HomeDirectory'

 DESC 'home directory path'

 EQUALITY caseExactMatch

 SYNTAX 1.3.6.1.4.1.1466.115.121.1.15

 SINGLE-VALUE )

olcObjectClasses: {0}( 1.3.6.1.4.1.30540.2.2.100 NAME 'Amazon Account'

 DESC 'Honk if you like clouds'

 SUP top AUXILIARY MAY ( ec2HomeDirectory ) )
Edit /etc/openldap/slapd.conf and remove the schema file we added in the beginning and erase the associate ldif file from the slapd.d\cn=config\cn=schema folder. Use the same launchctl command as above to start your service back up and it should all be good to go!
- launchctl load /System/Library/LaunchDaemons/org.openldap.slapd.plist
 When I first arrived at Free Geek I was amazed at how much computer hardware there actually was, but even MORE amazed the second time I went to see that it all had changed. I mean, all of it. The amount of hardware that that flows through their doors is mind boggling. Immediately I knew this was something I wanted to be a part of. I met one of the founders and explained my talents and I what I could do for them, Ifny LaChance, she hugged me! She explained that Free Geek was desperately in need of a good Systems Administrator as their current person could not adequately handle the failing systems. The Free Geek infrastructure suffered from network outages, power outages, overheating, and poor performance, and they were all considered part and parcel of the environment. Most of the users had learned to live with it, or work around the issues.


